The moment you walk into a room wearing a perfect skeleton makeup look, the whole room goes quiet. Heads turn. Phones come out. Somebody whispers, “How did she do that?” Skeleton makeup is more than a Halloween trend. It is a chance to be creative, to surprise people, and to feel completely confident in a bold new look. Start with the base, build the bones step by step, and add your own twist, whether pretty, cute, or truly spooky.
The good news is that a skeleton makeup woman look is not as hard as it seems. You do not need to be a professional artist. You need a few simple products, a steady hand, and a clear step-by-step plan. This guide gives you exactly that.
Whether you want a full face, a skeleton makeup woman half face one side look, a pretty and cute skeleton makeup, or a dramatic skeleton makeup woman neck design that reaches down to your collarbone, you will find every step explained in detail below. Grab your brushes and let’s turn you into the most unforgettable skeleton at the party.
Read, Hygiene Hacks for ALL Girls – 12 Underrated Tips That Will Change Your Routine
Why Skeleton Makeup Is the Ultimate Glow Up for Halloween
Skeleton makeup is a favorite for a reason. It is bold and dramatic, yet it works on every skin tone, face shape, and skill level. It also photographs beautifully, which makes it perfect for sharing on social media.
Here is what makes it so popular with women and girls:
- It is dramatic but flexible. You can go scary, glamorous, or soft and cute.
- It works with any outfit. Black dress, hoodie, or full costume, the makeup carries the look.
- It is beginner friendly. Skeleton shapes are simple lines, circles, and shading.
- It lets you be creative. Add glitter, gems, roses, or color to make it yours.
What You Need Before You Start
Gather everything first so you are not hunting for products with half a face painted.
Face and base
- Cleanser, moisturizer, and primer
- White face paint or white cream makeup (water-activated or cream-based)
- Translucent setting powder
Details and shading
- Black liquid eyeliner or black cream makeup
- A fine detail brush and a flat shader brush
- Gray or black eyeshadow for soft shading
- A small sponge or makeup sponge
Finishing
- Setting spray
- Optional extras: cosmetic-grade glitter, face gems, lip color, fake lashes
Safety tip: Use only products made for skin, such as cosmetic or face-paint products. Never use craft paint or acrylic paint on your face or neck. Do a small patch test on your inner arm a day before, especially if you have sensitive skin.
Step 1: Prep Your Skin Like a Pro
Great makeup starts with a clean canvas. Wash your face with a gentle cleanser and pat it dry. Apply a light layer of moisturizer and let it absorb for a couple of minutes. If you have oily skin, focus on a mattifying primer. If you have dry skin, choose a hydrating one.
Pull your hair back with a headband or clips so nothing touches your face while you work. If you are planning a neck design, tie your hair up high, or pin it to one side.
Why this matters: white face paint can look patchy on dry or uneven skin. Good prep keeps the color smooth and helps the whole look last for hours.
Step 2: Plan Your Design Before Touching the Paint
Before you pick up a brush, decide which version you want. This one choice shapes every step that follows.
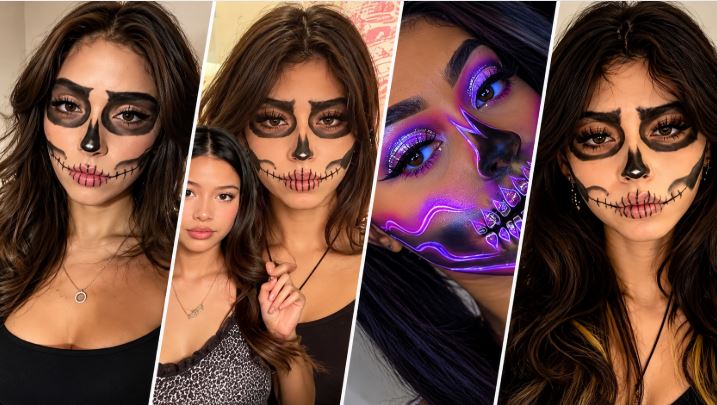
- Full face skeleton: The classic look. The entire face is painted white with bones drawn on top.
- Half face skeleton (one side): Only one side of your face becomes the skeleton. The other side stays natural or glam. This is the most striking option and often the easiest to finish quickly.
- Pretty and cute skeleton: Softer lines, pastel shading, hearts, flowers, and glitter instead of harsh black.
- Skeleton with neck design: The bones continue below the jaw, down the neck, and toward the collarbone.
Tip: Take a quick selfie and lightly sketch your plan with a white eyeliner pencil. Mistakes are much easier to fix at this stage.
Step 3: Apply the White Base
Using a sponge or flat brush, apply white face paint in thin, even layers. Start at the center of the area and blend outward.
For a half face skeleton, draw a clean line down the middle of your face, from your hairline through the center of your nose to your chin. Paint only one side. Keep the line sharp for a dramatic split, or blur it softly for a ghostly fade.
Build the color in two or three thin layers rather than one thick coat. Thick paint cracks and feels heavy. Let each layer dry before adding the next.
Avoid getting paint inside your eyes and mouth, and keep it away from your eyebrows if you want them to blend later.
Step 4: Set the Base With Powder
Dust translucent powder over the white paint using a fluffy brush. This locks the base, removes tackiness, and stops the black details from smudging in the next steps.
Press the powder in rather than rubbing it. Rubbing can lift the paint and leave gaps.
Shake off the excess and wait about a minute before moving on.
Step 5: Create the Eye Sockets
The eyes are the heart of any skeleton look, so take your time here.
Using black eyeshadow or black cream makeup, draw a large circle or rounded shape around each eye. Make it slightly bigger than your natural eye area. Fill it in with a flat brush, then soften the outer edge with a clean blender brush so it does not look flat.
For a pretty or cute version, swap solid black for charcoal gray and blend it into a soft smoky shape. You can add a tiny sparkle on the inner corner of the eye.
For a half face look, only create the socket on the painted side. Leave the other eye bare, or give it a glamorous winged liner for contrast.
Creepy detail: add a small white dot or glint inside the dark socket. It makes the eye look hollow and haunting.
Step 6: Shape the Nose Cavity
A skeleton nose is a small upside-down heart or triangle shape. Using your detail brush and black eyeshadow, lightly draw it at the tip of your nose, then fill it in.
Smudge the edges slightly so the shape melts into the skin rather than looking stamped on. If you want a cute version, keep it small and rounded. For a scarier version, make it longer and sharper.
For a half face look, draw only half of the nasal cavity along your center line, so it reads as a bone shape cut in half.
Step 7: Define the Cheekbones With Shading
This step is where your skeleton gets depth. Without shading, the face looks like a flat mask. With it, the bones look real.
Suck in your cheeks gently to find the hollow below your cheekbone. Using gray eyeshadow on a fluffy brush, sweep color into that hollow, then blend it up toward your ear.
Add a little gray shading along the temples and the sides of the nose. Build it slowly. A soft gradient is far more convincing than a hard line.
Pro trick: Highlight the top of the cheekbone with a bit of white powder to make the bone pop forward.
Step 8: Draw the Teeth and Mouth Lines
With your black liquid eyeliner, draw vertical lines from your upper lip upward toward the nose, and from your lower lip downward toward the chin. These become the teeth.
Next, draw a thin horizontal line across your lips and extend it out to both sides of your mouth, as if the jaw were stitched open. Then draw short vertical lines across the line to form individual teeth.
Keep the spacing even. A steady hand matters here, so rest your elbow on a table to stay stable.
For a cute skeleton, make the teeth shorter and neater, and finish with a soft pink or berry lip color in the center. For a spooky skeleton, leave the lips natural or paint them dark.
In a half face design, draw the teeth only on the painted side and let them fade as they cross your center line.
Step 9: Add the Forehead and Jaw Bone Details
Now give your skeleton more structure. Draw thin curved lines across the forehead to suggest cracks, or add a spider-web style crack that starts at a temple and spreads outward.
Along the jawline, draw a slightly curved line from below your ear toward your chin. This makes the lower face look like a real jaw bone.
Use a very light hand. Thin, confident lines look elegant. Thick, shaky lines look messy.
If you make a mistake, dip a cotton swab in a little micellar water and gently wipe it away, then re-powder the area.
Step 10: Extend the Design Down the Neck
A skeleton makeup woman neck design is what turns a nice face into a full showstopper.
First, apply white paint or body-safe cream makeup to the front of your neck, blending it down to the collarbone. Set it with powder just like you did on the face.
Then draw the following with black liquid eyeliner:
- Neck bones: A vertical column of small rounded rectangles down the center of the throat, getting slightly larger as they go down.
- Collarbones: Two long, gently curved lines that start in the center of the chest and sweep outward toward each shoulder.
- Shadows: Gray shading under each bone to give a 3D effect.
If you are wearing a deep neckline, or off-the-shoulder top, you can continue the ribs across the chest for an even bolder look.
Important: Make sure the neck paint is fully set and dry before putting on clothes, or it can transfer to fabric.
Step 11: Add Glam, Color, or Cute Details
This is the step where you make the look truly yours. Choose a style that matches your personality.
- Pretty skeleton: Add a thin line of silver or rose gold glitter along the cheekbones and under the eyes.
- Cute skeleton: Draw small hearts, stars, or flowers on the cheek or forehead. Use pastel pink, lavender, or baby blue.
- Dark glam skeleton: Add dramatic false lashes, black lipstick, and deep burgundy shading.
- Rose and bones: Paint a small red rose that grows from the eye socket or the jawline.
Face gems, a tiny sparkle at the corner of the eye, or a halo of glitter near your hairline can completely change the mood.
Keep glitter and gems limited to cosmetic-safe products and keep them away from your eyes.
Step 12: Seal the Look and Take Your Photos
Hold your setting spray about a foot from your face and mist it evenly with your eyes and mouth closed. Let it dry completely, without touching your face.
Now it is time for the fun part. Pose in front of a dark background or under soft, moody lighting. Natural light near a window is perfect for clear detail photos. Try these poses to get the most shocking shots:
- A slow side profile, showing the half face split
- Looking straight into the camera with a blank, still expression
- Tilting your chin up to show off the neck bones
- Peeking from behind your hand, with only the skeleton eye showing
A slight smile on the cute version, or a serious stare on the spooky version, both work beautifully.
More, How to Become UNRECOGNIZABLE in 7 Days (Low-Maintenance Glow Up Routine)
How to Remove Skeleton Makeup Safely
Do not scrub. Start with a gentle cleansing balm or oil, and massage it over the painted areas for a minute to break down the paint. Wipe with a warm, damp cloth, then wash with your normal cleanser. Finish with moisturizer.
For your neck and chest, use the same process, with extra gentleness, as the skin there is thin.
Quick Tips for the Best Skeleton Look
- Work in thin layers and let each one dry.
- Use a mirror with good lighting, ideally facing a window.
- Keep cotton swabs and micellar water nearby for quick fixes.
- Practice once before the event if you are a beginner.
- Match your hairstyle to your look: a sleek ponytail shows off the neck, loose waves soften the cute version.
- Carry a small pot of white paint, powder, and a brush for touch-ups during the night.
Frequently Asked Questions
How long does skeleton makeup take? Expect about 45 to 90 minutes for a full face, and about 30 to 45 minutes for a half face. Adding the neck design adds about 15 to 20 minutes.
Can beginners do skeleton makeup? Yes. Start with the half face version. It is simpler, and any small mistakes blend naturally with the rest of the look.
What if I have sensitive skin? Choose hypoallergenic, cosmetic-grade products, patch test beforehand, and avoid any product that stings or itches.
Can I do skeleton makeup without face paint? Yes. You can use white eyeshadow, white eyeliner, and a white cream foundation as a lighter base, though it will be less opaque.