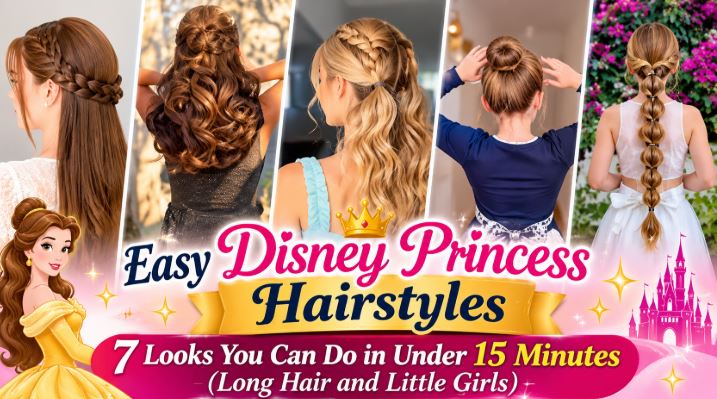
Easy Disney princess hairstyles for long and medium hair and little girls, with step-by-step guides, front-facing styles, and the best princess hair accessories right now.
Remember the promise at the start? The easiest hairstyle on this list is the Belle half-up with a bow, and it is also the most versatile. Start there, then move on to braids and crown styles as your confidence grows.
| Hairstyle | Inspired By | Difficulty | Time | Best For | Hair Length |
|---|---|---|---|---|---|
| Side Fishtail Braid | Elsa | Easy | 10 min | Little girls, teens, women | Medium to long |
| Long Loose Braid With Flowers | Rapunzel | Easy | 12 min | Parties, photos | Long |
| Half-Up Half-Down With Bow | Belle | Very easy | 5 min | School, everyday | Any |
| Soft Mermaid Waves | Ariel | Easy | 15 min | Women, teens | Medium to long |
| Classic Low Bun | Cinderella | Medium | 10 min | Formal events | Medium to long |
| High Ponytail With Braid Wrap | Jasmine | Easy | 8 min | Active kids, dance | Long |
| Crown Braid With Face-Framing Strands | Aurora | Medium | 15 min | Weddings, front-view photos | Long |
The Mistake 9 Out of 10 Moms and Girls Make With Princess Hair
Picture this: it is Saturday morning, your little girl is wearing her favorite gown, and she asks for “Elsa hair.” You try a braid. It is lopsided. She frowns. Ten minutes later you are watching a tutorial that makes it look impossible.
Here is the secret nobody tells you: Disney princess hair looks hard, but almost every style is built from just three simple moves: a twist, a braid, and a loose curl. Master those and you can create every princess look in this post.
By the end of this guide you will know how to make seven iconic princess hairstyles, which ones work best for long hair, which are perfect for little girls, and which accessories make the look photo-ready. Stay until the end, because the last style is the easiest and the one most people never try.
Why Disney Princess Hairstyles Are Trending Right Now
Princess-inspired hair keeps coming back because it works for so many moments. Here is why demand stays strong:
- Live-action remakes and new releases keep bringing princess characters back into the spotlight, which sends people searching for the matching looks.
- Dress-up and birthday party season (Halloween, holidays, and spring parties) creates repeat spikes in searches for easy character hairstyles.
- “Soft girl” and “coquette” aesthetics have made braids, bows, ribbons, and half-up styles popular with teens and women, not only kids.
- Parents want quick styles that hold up through school, play, and photos.
- Mother-daughter matching looks are a favorite for photo shoots and family events.
Before You Start: The 5-Minute Prep That Makes Every Style Easier
This small step is what separates messy results from polished ones.
- Start with detangled hair. Brush from the ends up to the roots, gently, so it does not hurt or frizz.
- Use a light mist of water or detangling spray. Hair that is slightly damp holds braids and twists better than dry, slippery hair.
- Add texture if the hair is too silky. A tiny bit of dry shampoo or texturizing spray at the roots gives hair some grip so styles do not slide out.
- Gather your tools. You need a wide-tooth comb, a few clear elastics, small bobby pins, and your chosen accessory.
- Sit your model comfortably. For kids, play a favorite movie. A relaxed child means a faster, neater style.
1. Elsa Side Fishtail Braid (Easy Disney Princess Hairstyle for Long Hair)
This is the most searched princess style, and it is simpler than it looks.
What you need: brush, 2 clear elastics, optional sparkly clip or snowflake pin.
Step 1: Brush and sweep. Brush all the hair smooth and sweep it over one shoulder. This makes the braid sit on the side, just like Elsa.
Step 2: Split in two. Divide the hair into two equal sections. Hold one section in each hand.
Step 3: Take a small strand. Pull a thin piece from the outside of the left section. Cross it over the top and join it to the right section.
Step 4: Repeat on the other side. Take a thin piece from the outside of the right section and cross it to the left. Keep going. Thin strands make a tighter, prettier fishtail.
Step 5: Secure. When you reach the end, tie it off with a clear elastic.
Step 6: Pancake the braid. Gently pull on the edges of each loop to widen it. This is the secret that makes the braid look thick and full.
Step 7: Add the finishing touch. Pull out two face-framing strands in front and slide in a snowflake clip.
Little girl version: use a regular three-strand braid instead. It is faster and still looks magical.
2. Rapunzel Long Braid With Flowers
What you need: brush, elastic, 5 to 8 small flowers or flower clips.
Step 1: Brush smooth. Start with hair fully detangled, since this braid shows off length.
Step 2: Make a loose three-strand braid. Divide the hair into three sections and braid down. Keep tension gentle, because Rapunzel’s braid is soft, not tight.
Step 3: Tie the end. Secure it with an elastic and cover it with a ribbon or a strip of hair.
Step 4: Loosen. Tug each side of the braid lightly to make it look fuller and more romantic.
Step 5: Add the flowers. Slide small flowers into the gaps along the braid, spacing them out evenly. Use bobby pins behind each flower to keep it in place.
Pro tip: for extra length and drama, add a clip-in braid extension.
3. Belle Half-Up, Half-Down With a Bow (Best Princess Hairstyle Front View)
This one is perfect when you want a princess hairstyle front look that frames the face.
What you need: brush, elastic, bow clip or ribbon.
Step 1: Part the hair. Choose a center or side part. A center part gives a classic storybook look.
Step 2: Section the top. Take the hair from the top of the head, from just above each ear, and gather it back.
Step 3: Tie it. Secure with an elastic at the back of the head, at the crown.
Step 4: Cover the elastic. Attach a bow or wrap a ribbon around the elastic.
Step 5: Frame the face. Leave two thin strands loose at the front. Lightly curl them with a curling iron, or twist them around a finger while damp.
Why it works from the front: the lifted top adds height, and the loose strands soften the face, so photos look polished from the front.
4. Ariel Soft Mermaid Waves
What you need: curling wand or heatless curlers, light hairspray, shell or pearl clips.
Step 1: Section the hair. Split hair into four sections, top and bottom on each side.
Step 2: Curl away from the face. Wrap each small section around the wand, holding for about 8 seconds. Alternate curl directions for a natural look.
Step 3: Let the curls cool. Do not touch them for a minute. Cooling sets the wave.
Step 4: Brush through gently. Use your fingers or a wide-tooth comb to blend the curls into soft waves.
Step 5: Finish. Add a light mist of hairspray and pin back one side with a pearl or shell clip.
Heat-free option for kids: braid damp hair in two loose braids before bed and unbraid in the morning for soft waves.
5. Cinderella Classic Low Bun
What you need: brush, elastic, bobby pins, tiara or headband.
Step 1: Gather low. Pull all the hair into a low ponytail at the nape of the neck.
Step 2: Twist. Twist the ponytail into a rope.
Step 3: Wrap. Coil the twisted rope around the base of the ponytail.
Step 4: Pin. Secure with bobby pins, tucking the ends under.
Step 5: Pull out soft pieces. Gently tug a few strands at the front so the bun feels romantic instead of strict.
Step 6: Crown it. Add a headband or tiara in front of the bun for the full princess effect.
6. Jasmine High Ponytail With Braid Wrap (Great Princess Hairstyle for Little Girls)
This style stays in place during play, school, and dance class.
What you need: brush, 3 elastics, gold or jeweled hair cuff.
Step 1: Create the ponytail. Brush hair high at the crown and secure with an elastic.
Step 2: Split into sections. Divide the ponytail into three equal parts.
Step 3: Braid. Braid all the way down and tie off.
Step 4: Add hair cuffs. Slide in gold cuffs at two or three points along the ponytail.
Step 5: Wrap the base. Take a small strand from under the ponytail and wrap it around the elastic to hide it. Pin the end underneath.
7. Aurora Crown Braid With Face-Framing Strands
This is the hairstyle most people never try, and it is easier than it looks.
What you need: brush, 2 elastics, 8 to 10 bobby pins.
Step 1: Part down the middle. Make a clean center part from the forehead to the back.
Step 2: Braid each side. Make two loose braids, one on each side, down to the ends, and tie them off.
Step 3: Cross over the top. Bring the right braid across the top of the head like a headband and pin it behind the left ear.
Step 4: Repeat. Bring the left braid across and pin it behind the right ear, hiding the ends under the other braid.
Step 5: Check the pins. Make sure each pin is hidden and secure.
Step 6: Pull out face-framing strands. Gently release a few short pieces near the ears and forehead for a soft, glowy look.
Princess Hairstyles for Little Girls: Parent Safety and Comfort Tips
- Avoid tight styles. Constant tension on the scalp can cause discomfort and breakage. If your child winces, loosen the style.
- Use soft elastics. Snag-free, fabric-covered elastics are gentler than rubber bands.
- Skip heat tools on young kids. Heatless curls are safer.
- Check small accessories. Choose clips and pieces that are age-appropriate, and keep small parts away from toddlers.
- Take breaks from the same style. Let hair rest every few days.
Disney Princess Hair Accessories and Toys: What to Buy
This is where many readers decide to shop. The table below helps you choose.
| Item | Best For | Why People Love It | What to Look For |
|---|---|---|---|
| Princess tiara or crown | Birthdays, dress-up | Instantly finishes any look | Lightweight, comfortable band |
| Bow clips and ribbons | Belle, everyday looks | Easy way to add color | Strong clip grip |
| Pearl and shell clips | Ariel, mermaid looks | Pretty for teens and women too | Smooth edges, secure hold |
| Snag-free hair elastics | Braids, ponytails | Gentle on hair | Soft fabric, no metal |
| Hair cuffs and gems | Jasmine, Moana looks | Gives a premium finish | Adjustable fit |
| Clip-in braid extensions | Rapunzel, Elsa looks | Adds length and volume | Color-matched to hair |
| Princess styling doll head or play set | Practice and play | Kids can style hair too | Safe materials, easy to brush |
| Hair accessory gift sets | Gifts | Everything in one box | Quality clips, variety |
Common Mistakes to Avoid
- Braiding dry, slippery hair. Add a little texture first.
- Using thick strands for the fishtail. Thin strands look neater.
- Pinning too high. Pins should sit where they are hidden, usually behind the ear or under the braid.
- Skipping the loosening step. Pulling the braid apart slightly is what makes it look professional.
- Overloading with accessories. Choose one star piece and let it shine.
Frequently Asked Questions
What is the easiest Disney princess hairstyle for beginners? The Belle half-up, half-down with a bow takes about five minutes and needs only an elastic and a clip.
What is a good Disney princess hairstyle for long hair? The Elsa side fishtail and the Rapunzel braid show off length beautifully.
How do I make princess hairstyles last all day? Use a little texturizing spray, secure with bobby pins in an X shape, and finish with a light hairspray.
Can adults and teens wear these styles too? Yes. Half-up styles, braids, and soft waves are popular for weddings, photos, and everyday wear.